
The biggest challenge: conserving Michelangelo's 'Epifania'
See the newly conserved Epifania alongside other powerful works from Michelangelo's final 30 years in the major exhibition, Michelangelo: the last decades.
Ahead of our major new exhibition, Michelangelo: the last decades, conservators Caroline Barry and Emma Turner reveal how they got a rare Michelangelo masterpiece ready to take centre stage.
Intro
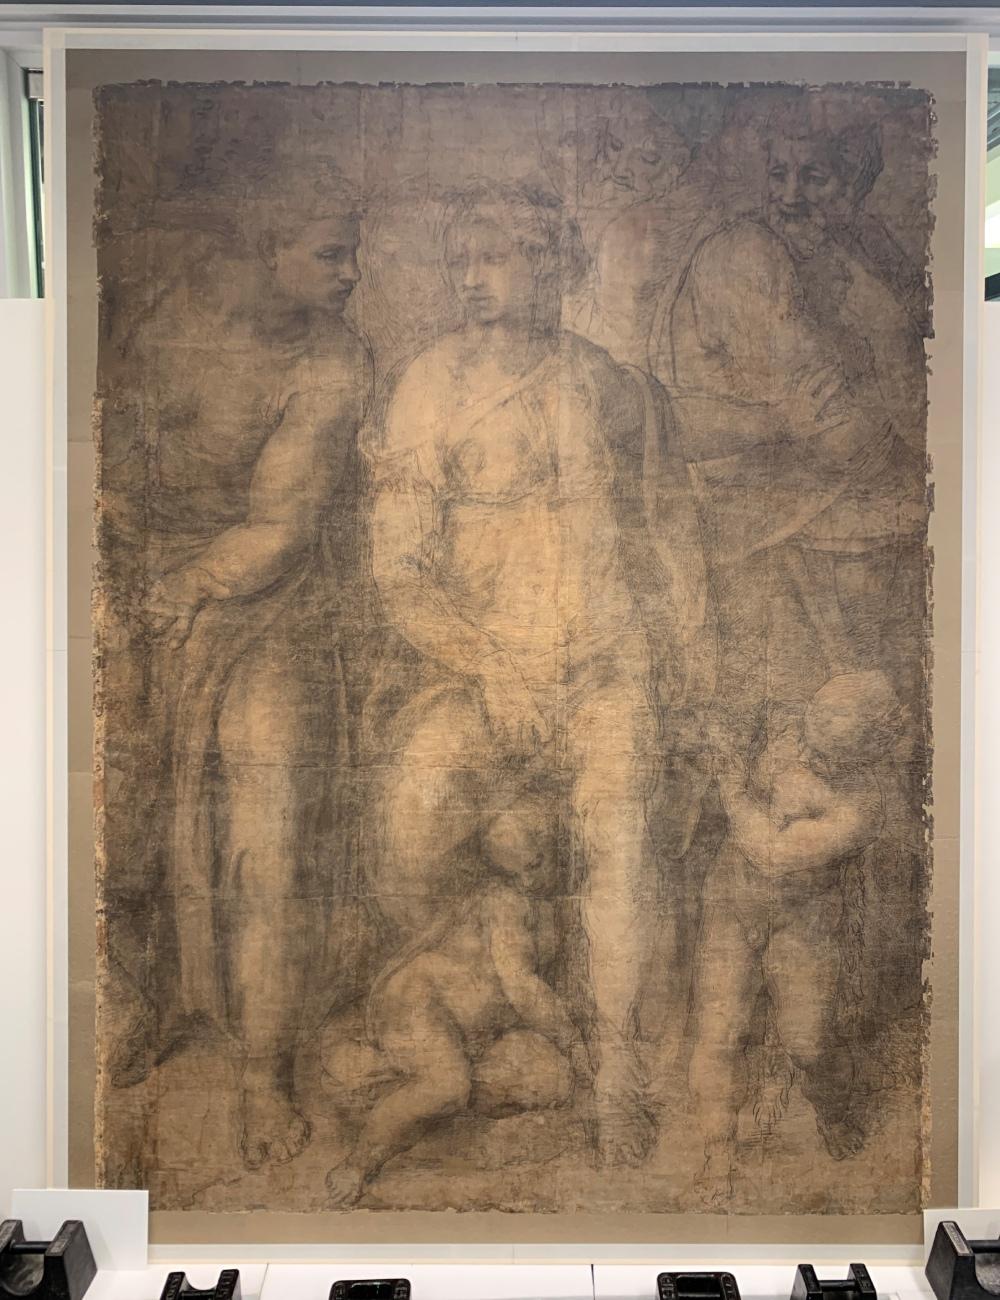
In the British Museum, we have one of the only two surviving Michelangelo cartoons (a 1:1 scale preparatory drawing) by this master craftsman of Renaissance art. It was made in around 1550–53 for his biographer and fellow artist, Ascanio Condivi, to use as a design for a painting. Known as the Epifania it measures just over 2.3 metres in height by 1.7 metres in width. Michelangelo is rumoured to have burned drawings during his lifetime, to guard his working methods and to ensure only perfect images survived, so it is a very rare and precious work.
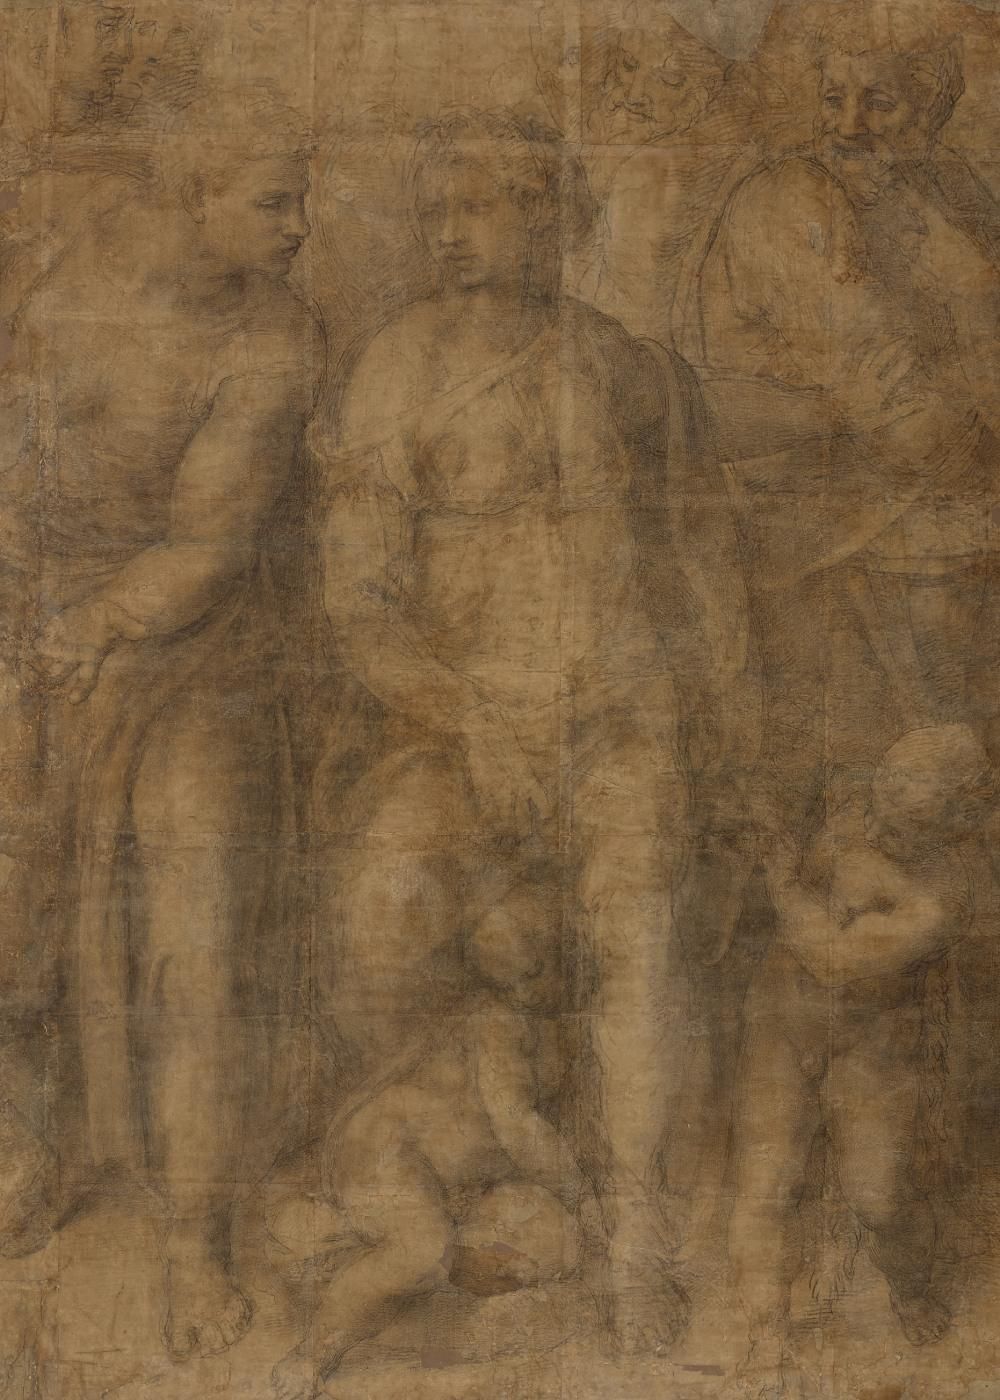
For any conservator of art on paper, working on the largest drawing by Michelangelo has got to be the highlight of their career. Generally, conservators undertake minimal treatments with Old Master drawings. They are drawn on handmade, excellent-quality paper and are highly likely to have been worked on by previous generations of museum restorers and conservators. This cartoon is an exception, having never been dismounted or treated since it came to the Museum in 1895. It was going to get its conservation debut with us – and what a challenge it has proved to be!
Research began back in 2006, when Scientific Research tests told us that there were significant levels of volatile organic compounds (that's the vinegary smell you get from old books) between the back of the cartoon and its solid pine panel. This meant that the wood of the panel and the poor-quality brown paper backing were causing damage to the cartoon, giving off acids as they aged that would degrade even top-quality 16th-century paper.
Unfortunately it wasn't possible to work on it until the World Conservation and Exhibition Centre (WCEC) opened its doors in 2014 – and not until we started planning for the Michelangelo exhibition in 2024 (the timing of which was delayed by the pandemic) that we were able to work on it full-time.
Layers of history
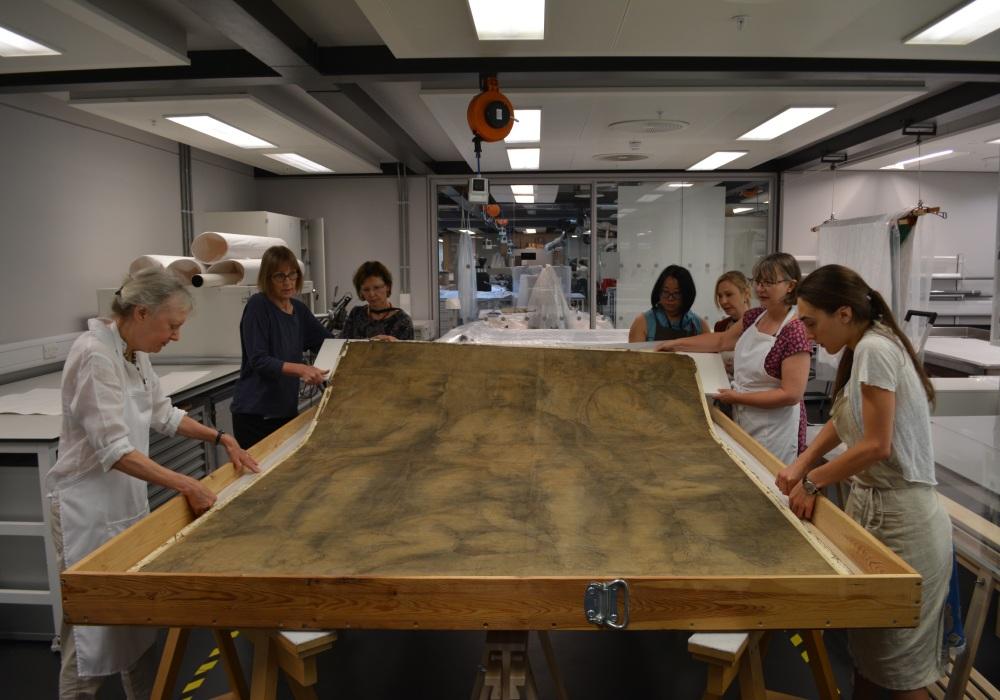
From our examination and research, we now know that, since being found rolled-up in Michelangelo's studio after his death, the Epifania has travelled through the hands of various collectors in Europe and the UK and had two canvas linings removed before the brown wrapping paper was used as a backing in the mid-19th century. That means there has been at least three layers of old-style glue – a mixture of starch (flour paste) and protein (boiled animal bones) – applied to the back of the cartoon. If you imagine these glue layers becoming brown and brittle over hundreds of years, it is not surprising that the paper is now very discoloured and torn, or that the image on the front (drawn in black chalk and charcoal) seems a bit indistinct. It is also extremely fragile. It takes a team of eight conservators, and half a day's planning, just to turn it over. Fortunately, we not only have skilled paper conservators in the Western Art team, but our Conservation Mounters, and those with knowledge and expertise in the East Asian Art team as well. And we needed all areas of expertise for this project!
Once the cartoon was turned over to the verso (the back of a drawing), we could see the whole of the backing paper and it was not good news. The brown paper was weak, tearing easily, leaching brown discolouration, and there were air pockets where it was not stuck to the cartoon. Because of this, we decided that, to preserve the Epifania for future generations, we needed to remove the brown paper backing, make new repairs and re-line it with high quality conservation-grade materials.

The first steps
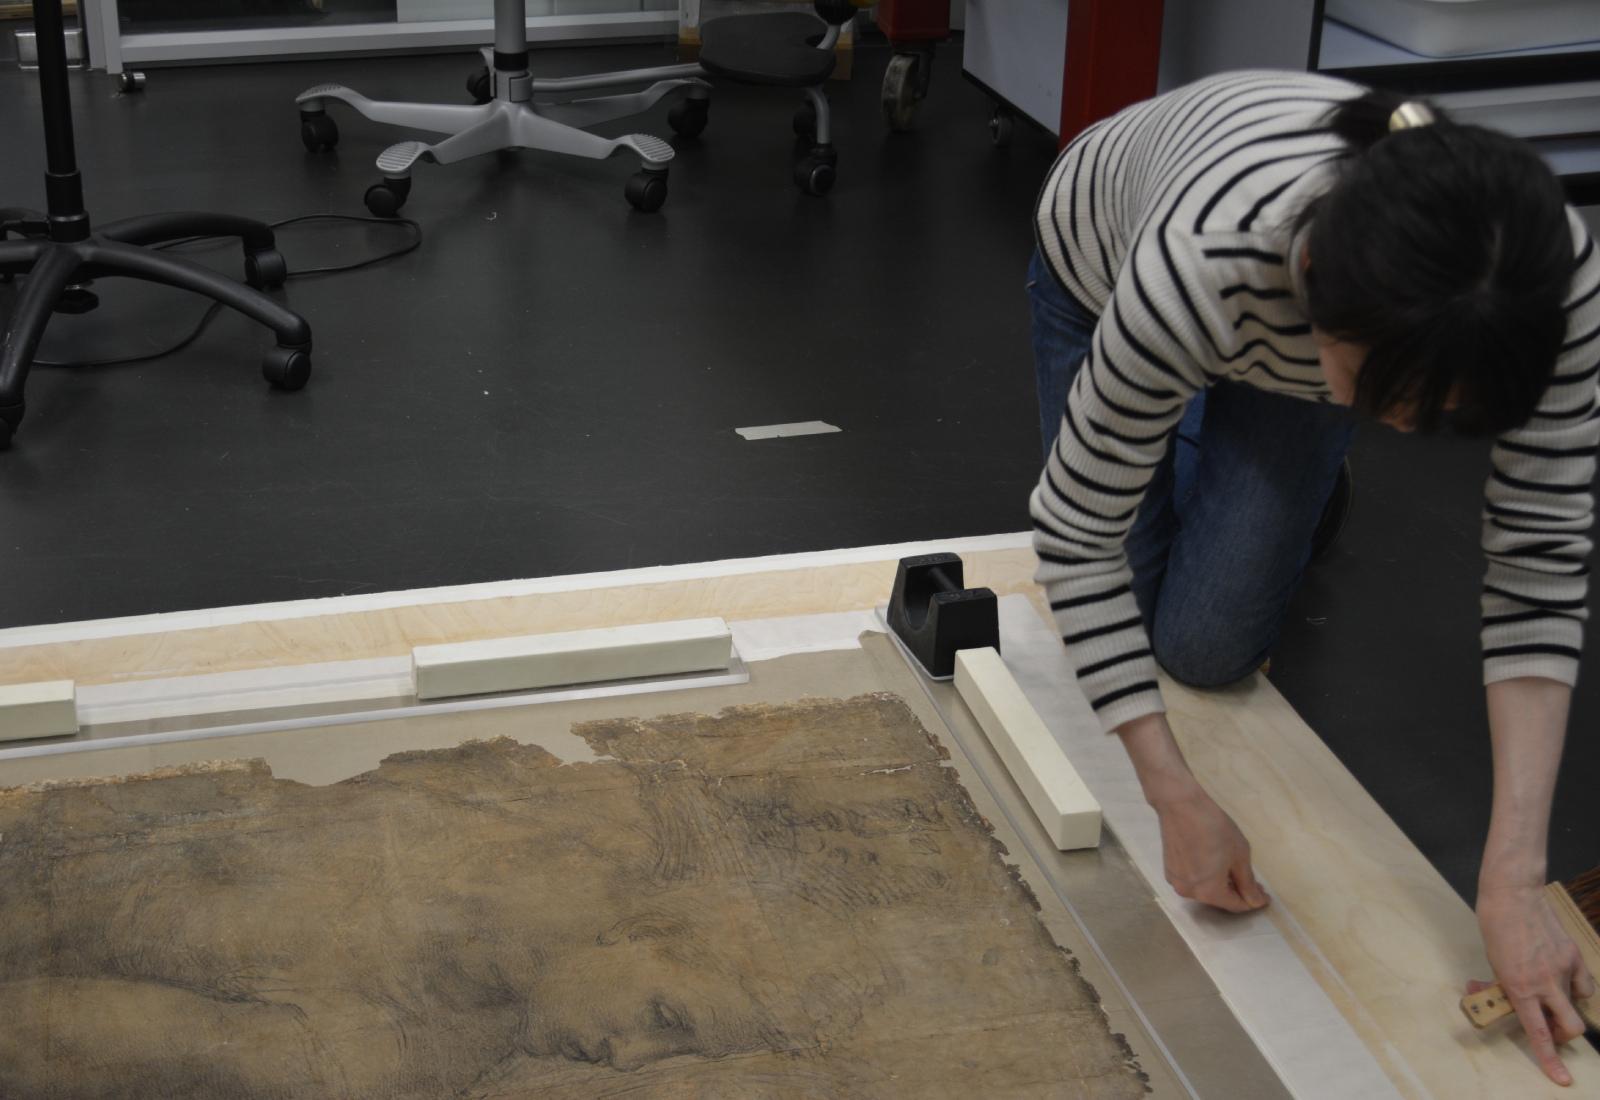
Such an extensive treatment was a major undertaking and, even with over a year to go until the exhibition, we felt the deadline looming. The first stage was to remove the backing paper. We needed to use water to soften the glue that attached the backing paper to the cartoon, however we were aware that the uncontrolled introduction of moisture might cause significant physical changes. Also, as the cartoon is constructed from 26 overlapping sheets of paper, we could not risk these joints coming apart.
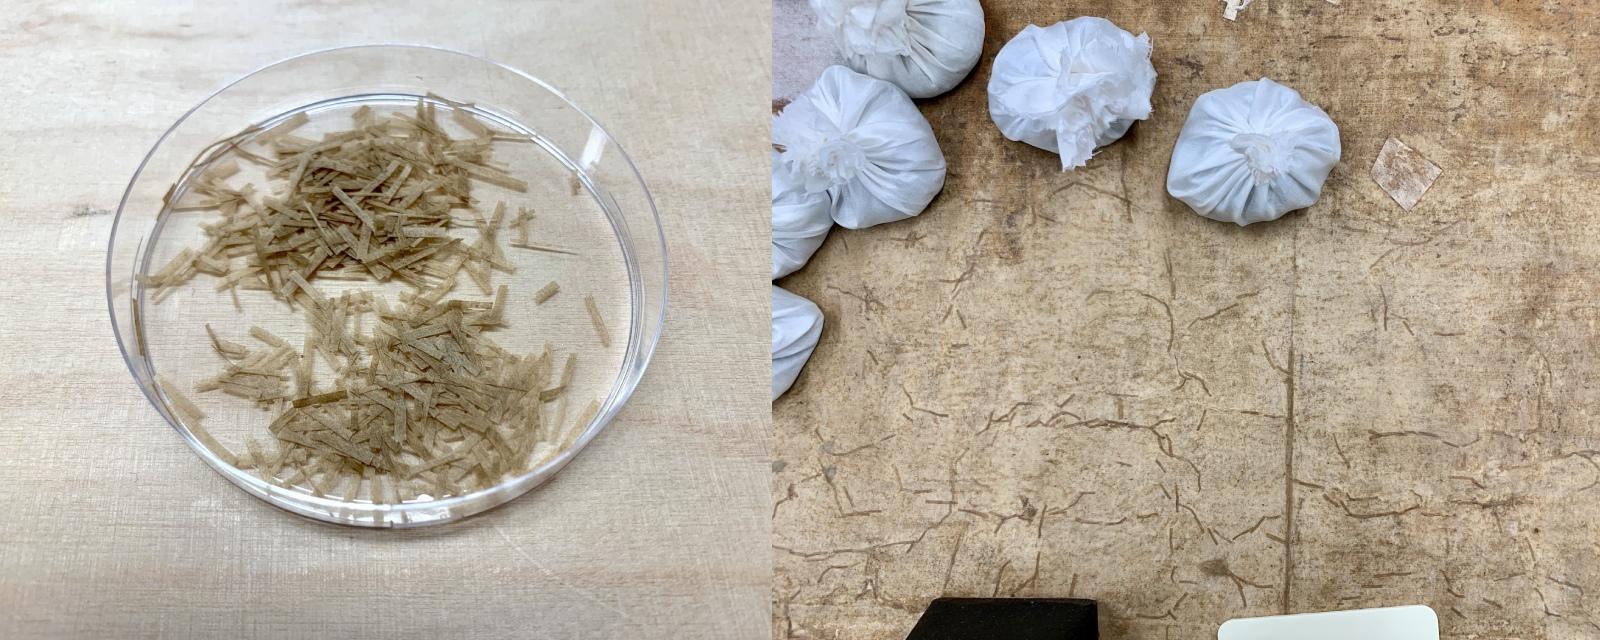
To limit the amount of water being introduced we looked specifically at chemical gels, which allow us to introduce moisture over small areas, in a very controlled way, to the lining paper and old glue. We also made another type of gel – a physical gel – and cut this into shapes that we could use like a brush, to deliver just a little extra moisture where we needed it. We then used tweezers, spatulas and small, blunted scalpel blades to peel off the paper and reduce the thick layer of glue. It was painstaking work, and it took the team seven months just to remove the backing paper.

Filling in the gaps
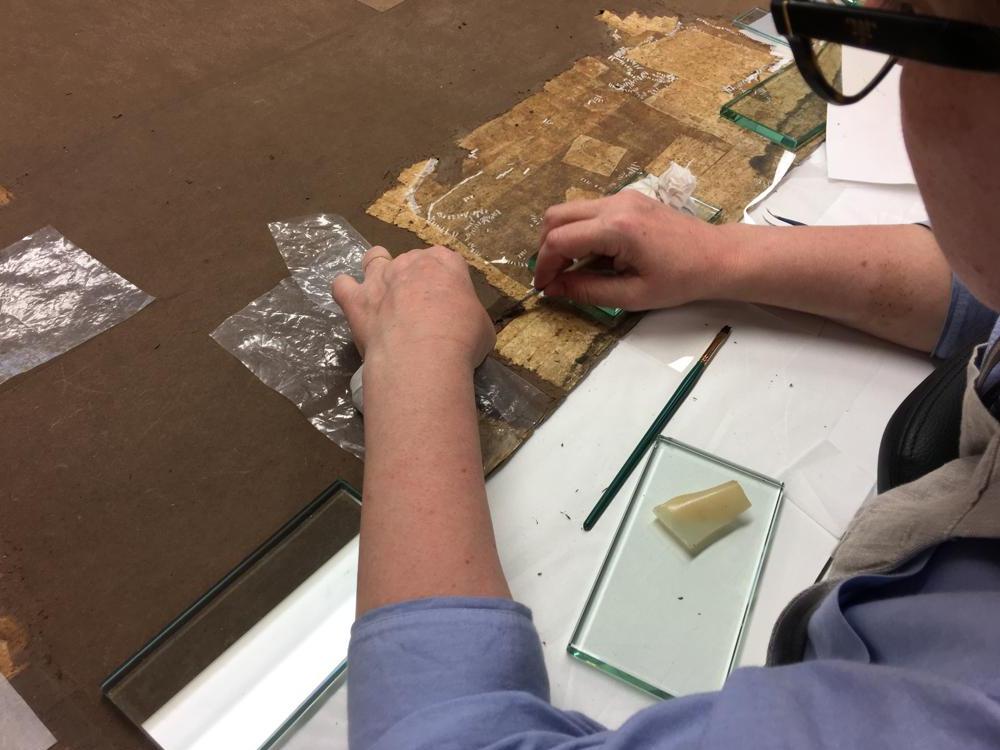
We then moved on to the process of repairing the extensive tears and losses within the cartoon. To do this, we needed to ensure that we had enough equipment for a drawing this big without depriving the rest of the studio. We particularly needed weights to hold repairs in place and prevent the cartoon paper from contracting – and some of the team developed sewing skills in the making of small cotton and silk bag weights to hold down repairs as they dried.

Repairs were made using thin Japanese paper (known for its long fibres that provide a lot of strength) and gluten-free wheat starch paste. Some of the paper was dyed brown so it wouldn't be visible behind hair-line tears. There were lots of old paper repair patches stuck to the back of the cartoon that were holding parts of it together. We removed these or skinned them down to the thinnest layer possible, so that the cartoon paper would flatten out as we progressed. We infilled areas of loss with Japanese paper of a similar thickness to the cartoon. This was pre-dyed to a lighter tone than the cartoon, allowing us to tone it to the surrounding area later.
We then added a margin of paper around all four edges of the cartoon. This had two functions: it stabilised the edges, which were the areas with most loss, and it provided a border which enabled us to show, rather than cover, the cartoon edges when it was framed.
Giving support
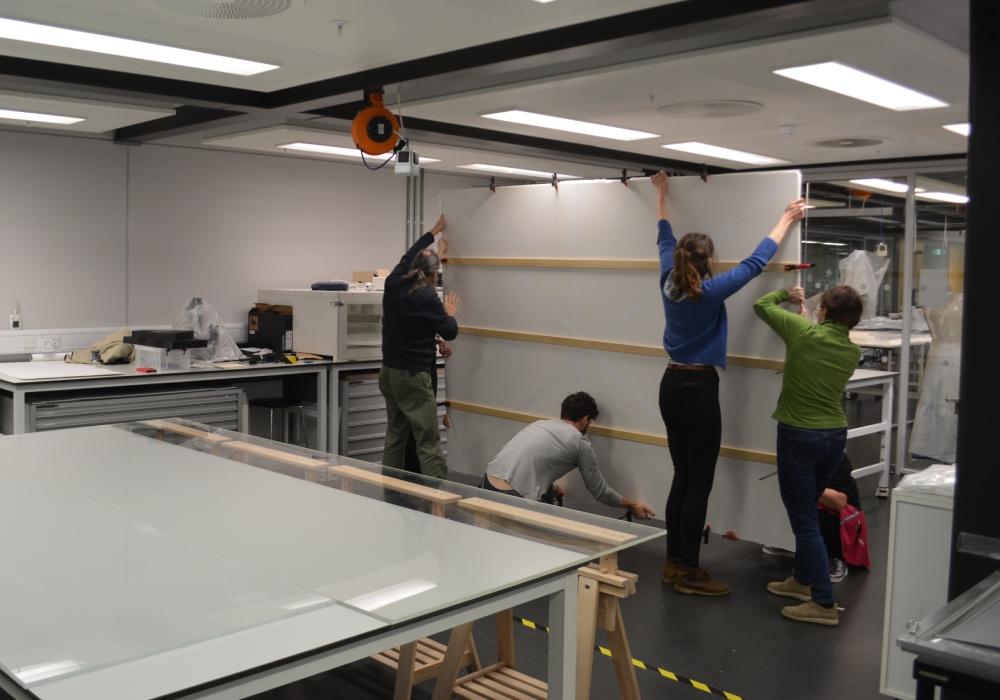
Now the time had come for our biggest treatment challenge: re-lining the cartoon. To mount and frame the cartoon it must be strong enough to hold its own weight, so relining was essential. Working extensively with our specialist conservators from Eastern Art on Paper and Silk, who routinely re-line large format works on paper, we devised a method to achieve a new lining. Our plan was to fully adhere three layers of Japanese paper across the verso of the cartoon. The Japanese paper selected for the job was chosen in three weights, which we applied from lightest to heaviest, increasing the strength of the cartoon with each lining. We were careful to rotate the grain direction of the paper with each lining, so that we did not give an intrinsic curl to the cartoon.
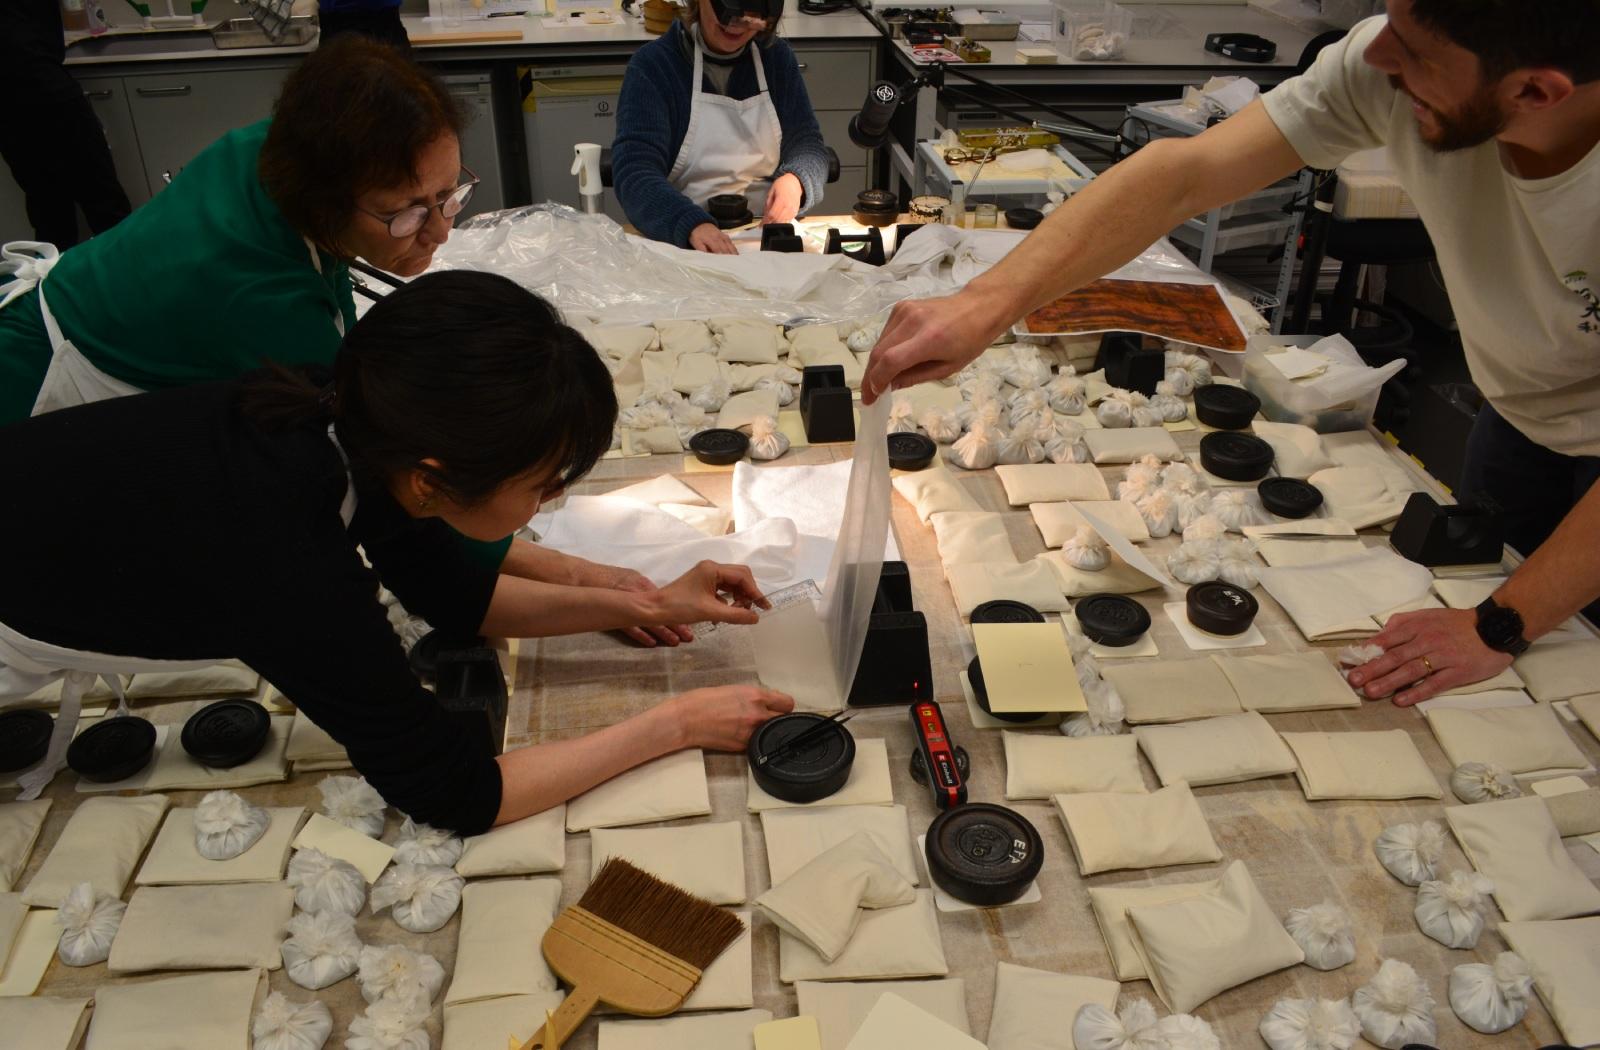
The final layer of lining paper was made of eight rows of paper which spanned the full width of the cartoon (more than 170cm!). Years of experience enabled our Eastern Art conservators to precisely paste, lift, position and adhere these long strips perfectly. Good adhesion was ensured by repeatedly brushing the lining and using raking light (which reveals bubbles in the surface) to ensure that no air pockets formed.


After the lining had been applied the cartoon was turned over, so that it could dry face-up on a wooden drying board, to ensure it dried as evenly as possible.
Finishing touches
We were then ready to make the finishing touches to the cartoon. We checked the entire surface, addressing small undulations by locally pressing them under weight, checked that every area of the cartoon was fully supported, and toned the infills made in areas of loss so that they were not visually distracting.
Once the cartoon was upright and ready for framing, we were delighted to see that all our efforts had improved the visibility of the drawing and evened out the tone of the paper. Just as satisfying was the knowledge that we had removed so much of the material that was causing degradation of the paper. The cartoon was now ready for the exhibition and in the best condition for future generations to enjoy.
Conclusion
We would like to acknowledge the project lead, Joanna Kosek, and all the paper conservators who have worked on the project.
See the newly conserved Epifania alongside other works from the last 30 years of Michelangelo's remarkable life in the major new exhibition, Michelangelo: the last decades, which opens 2 May.
Supported by James Bartos, Dunard Fund and a gift in memory of Melvin R. Seiden.
Funding for the conservation of the Epifania cartoon was generously provided through a grant from the Bank of America Art Conservation Project.


